
Wednesday, September 28, 2011
THREE posts? Wow. Here's Reuben's afghan as promised
I started a tradition when I was pregnant with Rachel of making an afghan after finding out the gender of my baby. Rachel's took forever to make, and I almost didn't finish it in time, but it turned out really quite nicely. I started Reuben's about the same week as my ultrasound and was nervous about being able to finish. I finished it in like 2 months hehe :D So here 'tis:


2 posts in one day? I think yes.
Well now that my fabulous update about Rachel's dress is out of the way, I read through some old posts and figured I was due for an update about my grey cardigan, so here goes.
I started this a loooong time ago, and was hoping to have it finished by fall 2010. Well, I found out I was pregnant in fall 2010, so I put this project aside since I knew it wouldn't fit/I wouldn't be wearing it for at least a year. In the meantime I worked on baby Reuben's afghan and Rachel's dress when my circulation would let me. Which reminds me, I never posted pics of Reuben's afghan. That will be next. Anyway. Once I finished Rachel's dress as far as knitting goes I pulled out my grey cardi again. And here's what happened.
First of all, this pattern is weird. I decided not to do the goofy vest insert thing, and decided to just do a straight stockinette stitch for both front panels. This gets complicated, though, because the vest insert thing is knitted separately AND sideways and then sewn on, so to change the pattern I had to do quite a bit of figuring. I tried out my re-worked pattern on the left front panel, and all seemed to go well, so I'm really excited. I then moved on to the right front panel and got about 8 inches up before noticing I had counted wrong on the waist shaping and had to almost start over. No biggie, it was only a few inches. But as I was unpicking it I realized that I should probably make sure the front shaping matches the back shaping. When I pulled out the back piece I finished about a year ago I realized a stupid thing I had done.
The pattern has you stockinette up about 10 inches and then switch to garter, so that's what I had done on the back. But when I changed the front to be straight stockinette all the way up I had forgotten this tidbit. Also when I worked the back I increased in a weird way that made it poof out, and was thinking of re-doing it anyway. So I spent the other day undoing a good 50 rows or so of my cardi back piece. :( I'm okay with it though, I can fix the poof problem at the same time as making a normal looking sweater.
So that's my update. I now have a front panel, about 1/4 of the other front panel, and I'm down to probably 1/6 of the back piece. I'm still planning on seeing how it looks as just a vest, so it might still be done by about Christmas if my kids let me knit every now and then.
I started this a loooong time ago, and was hoping to have it finished by fall 2010. Well, I found out I was pregnant in fall 2010, so I put this project aside since I knew it wouldn't fit/I wouldn't be wearing it for at least a year. In the meantime I worked on baby Reuben's afghan and Rachel's dress when my circulation would let me. Which reminds me, I never posted pics of Reuben's afghan. That will be next. Anyway. Once I finished Rachel's dress as far as knitting goes I pulled out my grey cardi again. And here's what happened.
First of all, this pattern is weird. I decided not to do the goofy vest insert thing, and decided to just do a straight stockinette stitch for both front panels. This gets complicated, though, because the vest insert thing is knitted separately AND sideways and then sewn on, so to change the pattern I had to do quite a bit of figuring. I tried out my re-worked pattern on the left front panel, and all seemed to go well, so I'm really excited. I then moved on to the right front panel and got about 8 inches up before noticing I had counted wrong on the waist shaping and had to almost start over. No biggie, it was only a few inches. But as I was unpicking it I realized that I should probably make sure the front shaping matches the back shaping. When I pulled out the back piece I finished about a year ago I realized a stupid thing I had done.
The pattern has you stockinette up about 10 inches and then switch to garter, so that's what I had done on the back. But when I changed the front to be straight stockinette all the way up I had forgotten this tidbit. Also when I worked the back I increased in a weird way that made it poof out, and was thinking of re-doing it anyway. So I spent the other day undoing a good 50 rows or so of my cardi back piece. :( I'm okay with it though, I can fix the poof problem at the same time as making a normal looking sweater.
So that's my update. I now have a front panel, about 1/4 of the other front panel, and I'm down to probably 1/6 of the back piece. I'm still planning on seeing how it looks as just a vest, so it might still be done by about Christmas if my kids let me knit every now and then.
I finished something!! This rarely happens anymore...
Having two babies makes knitting very unlikely. Lately I've been getting my kids to bed and then planning an hour or two of The Big Bang Theory while knitting, but Reuben has other plans. He goes down at 8, gets up at 8:30, down again by 9, up again by 9:30, and then down for good around 10. Tonight he actually went down permanently after his initial waking at 8:30, so I did end up with an hour BEFORE 10 pm, which was lovely.
And what did I do with that hour, you may ask? Well. I added buttons to Rachel's dress. That's right people, it's FINISHED!!

I don't think the blocking worked quite as well as I had hoped (or maybe I just used crappy yarn) and the pattern creator seems to think 2 yr olds are a lot fatter than mine is, but overall I'm happy with how it turned out :D
And what did I do with that hour, you may ask? Well. I added buttons to Rachel's dress. That's right people, it's FINISHED!!

I don't think the blocking worked quite as well as I had hoped (or maybe I just used crappy yarn) and the pattern creator seems to think 2 yr olds are a lot fatter than mine is, but overall I'm happy with how it turned out :D
Friday, January 28, 2011
L2 Sleeves
I mentioned earlier that I failed at one of the sleeves on this dress. I wanted to explain that a little further.
Basically I totally misread the pattern for the first sleeve I did. I was supposed to decrease every third round, and once I got to the right amount of stitches I was to continue stockinette for a few more inches until it reached the desired length. As I worked on the sleeve, I noticed it was not getting smaller very quickly. I measured, and I had reached the final length of the sleeve before I had finished decreasing. This was confusing, but whatever. I just finished it as I was supposed to and called it good.
When I got to the second sleeve I read the directions more carefully and realized my previous mistake. I was supposed to decrease TWO stitches every third round, and I had only done one. This not only made the sleeve extra poofy, but the line that showed where I decreased was twisting around the sleeve to the backside and looked really funny. Here are some pics:
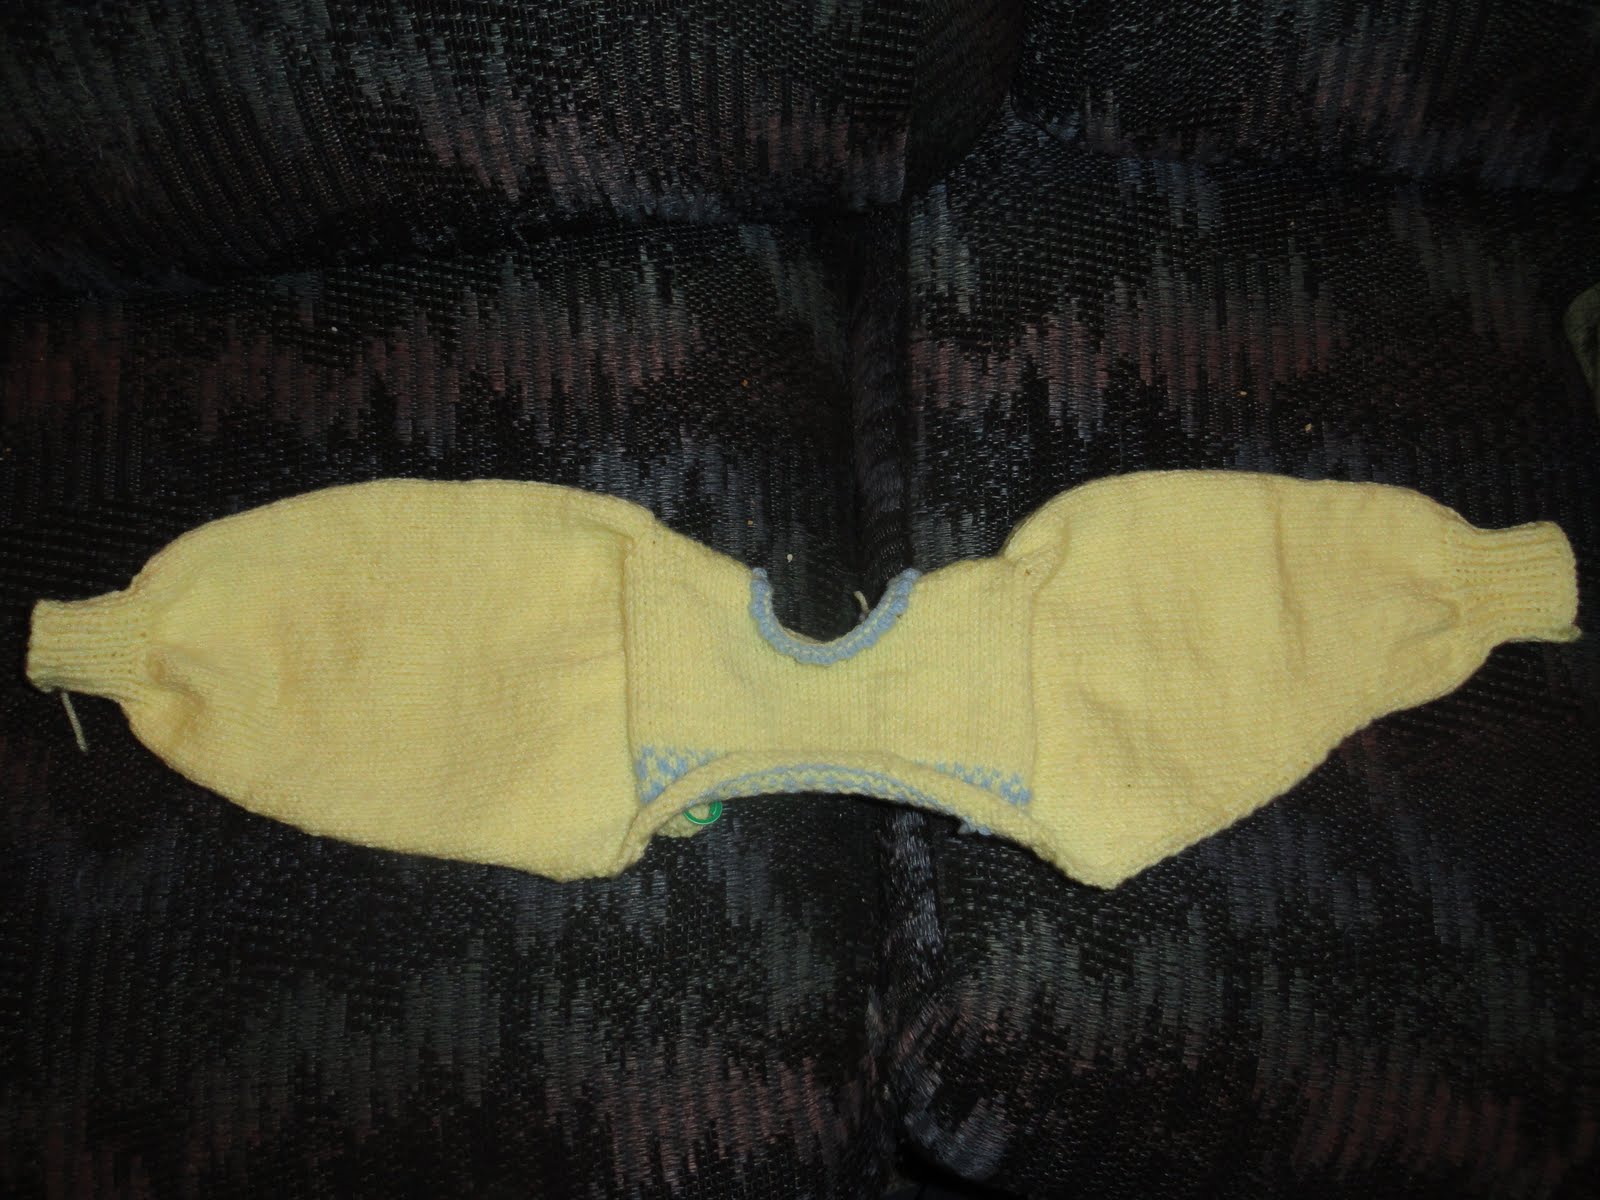
This first is to show the comparison of the two sleeves. As you can see, the one on the right is correct, as it gradually decreases in poofiness and comes to kind of a point. The one on the left is poofy all the way to the ribbed cuff, which it's not supposed to be.

Here's a closeup of the good sleeve. You can see the line of decreases, and you can see that it goes smoothly up the bottom of the sleeve to the cuff as a normal sleeve should do.

And here's the backside of the bad sleeve. You can see the line of decreases going diagonally across the back of the sleeve, which shouldn't be happening. It should be along the bottom as with the other. You can also again see the poofiness factor, and that the decreases go all the way to the cuff. On the other sleeve they stop a few inches before.

Needless to say, this was a good learning experience. I have since unpicked the left sleeve and redone it, so now it looks just like the right sleeve. I even painstakingly counted stitches so they are EXACTLY the same.
Basically I totally misread the pattern for the first sleeve I did. I was supposed to decrease every third round, and once I got to the right amount of stitches I was to continue stockinette for a few more inches until it reached the desired length. As I worked on the sleeve, I noticed it was not getting smaller very quickly. I measured, and I had reached the final length of the sleeve before I had finished decreasing. This was confusing, but whatever. I just finished it as I was supposed to and called it good.
When I got to the second sleeve I read the directions more carefully and realized my previous mistake. I was supposed to decrease TWO stitches every third round, and I had only done one. This not only made the sleeve extra poofy, but the line that showed where I decreased was twisting around the sleeve to the backside and looked really funny. Here are some pics:
This first is to show the comparison of the two sleeves. As you can see, the one on the right is correct, as it gradually decreases in poofiness and comes to kind of a point. The one on the left is poofy all the way to the ribbed cuff, which it's not supposed to be.
Here's a closeup of the good sleeve. You can see the line of decreases, and you can see that it goes smoothly up the bottom of the sleeve to the cuff as a normal sleeve should do.

And here's the backside of the bad sleeve. You can see the line of decreases going diagonally across the back of the sleeve, which shouldn't be happening. It should be along the bottom as with the other. You can also again see the poofiness factor, and that the decreases go all the way to the cuff. On the other sleeve they stop a few inches before.

Needless to say, this was a good learning experience. I have since unpicked the left sleeve and redone it, so now it looks just like the right sleeve. I even painstakingly counted stitches so they are EXACTLY the same.
Monday, January 24, 2011
Dress Update
This story sucks, but as it happened several weeks ago I finally feel I can share it without crying.
Let me start by explaining once again that I basically taught myself how to knit. One night for mutual in high school a neighbor showed us all the basics, but as any of you who have tried and then given up at least once for a period of at least 3 years know, it takes A LOT of practice to really KNOW how to knit. And I put that knitting project away basically for good after not getting very far at all on it. I only just recently started knitting again, and I've had to look up EVERYTHING on Youtube, so yeah, I'm giving myself the credit for being a self-learner here.
Anyway, I learned how to read crocheting patterns, so I just picked up a knitting pattern and went at it. As I went, if there were instructions I didn't understand, I looked up instructional videos for them. HOWEVER: if there were instructions I DID understand, I didn't look up videos. Herein lies my downfall.
How many of you know how to "pick up and knit" stitches along a finished edge? Doesn't that sound kind of self-explanatory? You pick up so many stitches, then you knit them. So that's what I did on every project. It would say, for example, "pick up 36 stitches along the neckline" so I would string through the stitches until I was holding 36 on my needle. This made PERFECT sense to me. I have learned now that that is NOT how it is done.
So here is my story.
I'm working on a sweater dress for Rachel, as you may have noticed below. This will be my crowning achievement as a knitter, because it will have taken me the longest and will have employed the most techniques, patience, and pain. I started it a few months ago, and recently put it away to finish Christmas presents and to start on an afghan for my forthcoming son. Besides, Rachel turns 2 in 2 months, and there is NO WAY this thing will fit my tiny child by then, so I'm not really in a hurry.
Anyway.
The dress is made by first knitting the bodice and back, then adding sleeves. Then the top is basically finished, aside from the buttons, and one must "pick up and knit" lots of stitches around the waistline. The dress is knit with size 6 circular needles, which are pretty small. My mom bought mine for me, but I managed to break it through an act of impatience and had to go buy a new one for $10. I was doing just fine picking up stitches, although it was pretty tight. We were playing Monopoly at the same time, so the tightness wasn't stressing me out too much because I was distracted. Once I got the proper amount of stitches on the needles I began to knit around. Again, this is how I've always done this, because this has been my interpretation of the instructions. It never occurred to me that I was doing it wrong, because it had worked on every other piece I'd knitted. But I digress.
As I began to knit it became apparent that this was not going to work. A portion of the stitches I had picked up were doubled, being the section where the back pieces overlap for the buttons. So this area was EXTRA tight. When that area of stitches got to the end of the cable where it joins with the wooden needle part, it got stuck. There was no way to get it up onto the wooden part. I tried for quite a while, and nothing doing. Eventually I thought, oh well I'll go the other way, and pulled it backwards. This, folks, is when my needle broke. I had pulled the cable out of the wooden part. I had already lost at Monopoly, so I just ran downstairs and cried. Oh, did I mention I'm pregnant?
I gave it several weeks before I felt up to venturing to the knitting genius world of Heindsman's for advice and a new needle. I was still upset that I might have to buy a new needle, because the way it broke was just idiotic and pretty much my fault for being stupid. Luckily the people there are SUPER nice and replaced the needle for free. I showed the checker my problem and he gave me the needle, saying I could just knit off my piece onto the new needle and give him the old one. Easier said than done. For some reason I hadn't anticipated this problem, but now I was back where I had started when I broke the needle in the first place.
I sat down and tried, by the same method, to knit the stitches I had picked up onto the new needle. I was met with the same resistance as before, and didn't know what to do. After I had been there for a while, the expert knitting lady came over and asked if I needed help. I explained what I was doing, and she looked really confused. She started trying to work it for me, and we were both obviously not on the same page about anything. After explaining it over and over, and after her staring at it for about 20 minutes, she finally saw what I had done and explained what was wrong with it. Being the expert that she is, she was able to figure out a way to get it off of the broken needle and onto the new needle. Unfortunately, this involved cutting the piece and basically starting the whole "pick up and knit" process all over again. I told her to do what she had to, and I sat back and watched. Eventually it got to be too much for Rachel, so the lady said I should go take care of her and come back later for my repaired dress. So that's what I did.
I felt okay going home, but a little foolish. I put Rachel down for a nap and headed back out to get my dress and learn how to "pick up and knit" stitches once and for all. When I got there, the store was pretty empty. The expert lady was still working on my dress, and a new woman was there working on a glove or something. As I walked in, the expert lady was explaining to the other woman what she was working on. I'll give her credit, she did not say anything about how stupid I was. The other lady did, though, and let me tell you how great THAT felt. I sat down with her, and she showed me how one is ACTUALLY supposed to "pick up and knit" stitches. She showed me how she had started, and where the seven ends of my yarn were since she had to cut it right at the waist, and how I needed to undo complicated knots because I was starting at the beginning, not the end, where it would just pull apart, and also she made some comments about how cheap the yarn was that I was using. I'm not trying to say she was being mean, because she really wasn't meaning to. But everything that day had been going terribly, so that's just how things came across to me. Plus I felt like a fool, and there was this other lady there just staring at me like what on earth was I doing pretending I know how to knit.
Anyway. I started crying again on the way home. BUT I had a new needle, and I knew how to "pick up and knit" in a way that would save me from this sort of headache in the future. Also the expert lady told me I should bring in the dress when I finish it so I can show everyone how it turns out. I don't know if that's actually going to happen, because I'm not sure how comfortable I feel showing my face there again after this fiasco. But we'll see. I'm going to be terribly proud of the dress when it is finished, so I might :D
Let me start by explaining once again that I basically taught myself how to knit. One night for mutual in high school a neighbor showed us all the basics, but as any of you who have tried and then given up at least once for a period of at least 3 years know, it takes A LOT of practice to really KNOW how to knit. And I put that knitting project away basically for good after not getting very far at all on it. I only just recently started knitting again, and I've had to look up EVERYTHING on Youtube, so yeah, I'm giving myself the credit for being a self-learner here.
Anyway, I learned how to read crocheting patterns, so I just picked up a knitting pattern and went at it. As I went, if there were instructions I didn't understand, I looked up instructional videos for them. HOWEVER: if there were instructions I DID understand, I didn't look up videos. Herein lies my downfall.
How many of you know how to "pick up and knit" stitches along a finished edge? Doesn't that sound kind of self-explanatory? You pick up so many stitches, then you knit them. So that's what I did on every project. It would say, for example, "pick up 36 stitches along the neckline" so I would string through the stitches until I was holding 36 on my needle. This made PERFECT sense to me. I have learned now that that is NOT how it is done.
So here is my story.
I'm working on a sweater dress for Rachel, as you may have noticed below. This will be my crowning achievement as a knitter, because it will have taken me the longest and will have employed the most techniques, patience, and pain. I started it a few months ago, and recently put it away to finish Christmas presents and to start on an afghan for my forthcoming son. Besides, Rachel turns 2 in 2 months, and there is NO WAY this thing will fit my tiny child by then, so I'm not really in a hurry.
Anyway.
The dress is made by first knitting the bodice and back, then adding sleeves. Then the top is basically finished, aside from the buttons, and one must "pick up and knit" lots of stitches around the waistline. The dress is knit with size 6 circular needles, which are pretty small. My mom bought mine for me, but I managed to break it through an act of impatience and had to go buy a new one for $10. I was doing just fine picking up stitches, although it was pretty tight. We were playing Monopoly at the same time, so the tightness wasn't stressing me out too much because I was distracted. Once I got the proper amount of stitches on the needles I began to knit around. Again, this is how I've always done this, because this has been my interpretation of the instructions. It never occurred to me that I was doing it wrong, because it had worked on every other piece I'd knitted. But I digress.
As I began to knit it became apparent that this was not going to work. A portion of the stitches I had picked up were doubled, being the section where the back pieces overlap for the buttons. So this area was EXTRA tight. When that area of stitches got to the end of the cable where it joins with the wooden needle part, it got stuck. There was no way to get it up onto the wooden part. I tried for quite a while, and nothing doing. Eventually I thought, oh well I'll go the other way, and pulled it backwards. This, folks, is when my needle broke. I had pulled the cable out of the wooden part. I had already lost at Monopoly, so I just ran downstairs and cried. Oh, did I mention I'm pregnant?
I gave it several weeks before I felt up to venturing to the knitting genius world of Heindsman's for advice and a new needle. I was still upset that I might have to buy a new needle, because the way it broke was just idiotic and pretty much my fault for being stupid. Luckily the people there are SUPER nice and replaced the needle for free. I showed the checker my problem and he gave me the needle, saying I could just knit off my piece onto the new needle and give him the old one. Easier said than done. For some reason I hadn't anticipated this problem, but now I was back where I had started when I broke the needle in the first place.
I sat down and tried, by the same method, to knit the stitches I had picked up onto the new needle. I was met with the same resistance as before, and didn't know what to do. After I had been there for a while, the expert knitting lady came over and asked if I needed help. I explained what I was doing, and she looked really confused. She started trying to work it for me, and we were both obviously not on the same page about anything. After explaining it over and over, and after her staring at it for about 20 minutes, she finally saw what I had done and explained what was wrong with it. Being the expert that she is, she was able to figure out a way to get it off of the broken needle and onto the new needle. Unfortunately, this involved cutting the piece and basically starting the whole "pick up and knit" process all over again. I told her to do what she had to, and I sat back and watched. Eventually it got to be too much for Rachel, so the lady said I should go take care of her and come back later for my repaired dress. So that's what I did.
I felt okay going home, but a little foolish. I put Rachel down for a nap and headed back out to get my dress and learn how to "pick up and knit" stitches once and for all. When I got there, the store was pretty empty. The expert lady was still working on my dress, and a new woman was there working on a glove or something. As I walked in, the expert lady was explaining to the other woman what she was working on. I'll give her credit, she did not say anything about how stupid I was. The other lady did, though, and let me tell you how great THAT felt. I sat down with her, and she showed me how one is ACTUALLY supposed to "pick up and knit" stitches. She showed me how she had started, and where the seven ends of my yarn were since she had to cut it right at the waist, and how I needed to undo complicated knots because I was starting at the beginning, not the end, where it would just pull apart, and also she made some comments about how cheap the yarn was that I was using. I'm not trying to say she was being mean, because she really wasn't meaning to. But everything that day had been going terribly, so that's just how things came across to me. Plus I felt like a fool, and there was this other lady there just staring at me like what on earth was I doing pretending I know how to knit.
Anyway. I started crying again on the way home. BUT I had a new needle, and I knew how to "pick up and knit" in a way that would save me from this sort of headache in the future. Also the expert lady told me I should bring in the dress when I finish it so I can show everyone how it turns out. I don't know if that's actually going to happen, because I'm not sure how comfortable I feel showing my face there again after this fiasco. But we'll see. I'm going to be terribly proud of the dress when it is finished, so I might :D
Wednesday, October 20, 2010
I finished something, woohoo!
Ok I made up a headband pattern and I actually finished it!

Close-up so you can see the ribbing.

This really didn't take too long to make, maybe like a day or two, but then it sat around waiting for a button for like a month.
It ended up being too big for my head, but that's really fine because headbands have never worked for me. I'm going to try to sell this one and see what happens. Maybe someday I really will get an Etsy shop going, we'll see :D
I'm also including pictures of the white cardigan I finished back in May that I haven't posted yet because I hadn't taken yet. No reason, really, just never got around to it. Here they are:


I do like this cardigan, but next time I'll make the sleeves longer and I'm not sure how much I like the button so I would probably change that a bit. With this I learned that you REALLY need to be careful to bind off VERY LOOSELY when doing the edging. It ended up curling funny because I didn't do it loosely enough. I was able to undo it and redo it just fine, though.
Also an update: I am still working on Rachel's dress. I finished one sleeve, but when I started on the next I realized I had read the pattern wrong and made the first sleeve skeewompus. It made sense after I read it, because I wasn't done decreasing by the time the sleeve was to its end and I was wondering how that happened. I'll post pics later so you can see what I mean.

Close-up so you can see the ribbing.

This really didn't take too long to make, maybe like a day or two, but then it sat around waiting for a button for like a month.
It ended up being too big for my head, but that's really fine because headbands have never worked for me. I'm going to try to sell this one and see what happens. Maybe someday I really will get an Etsy shop going, we'll see :D
I'm also including pictures of the white cardigan I finished back in May that I haven't posted yet because I hadn't taken yet. No reason, really, just never got around to it. Here they are:


I do like this cardigan, but next time I'll make the sleeves longer and I'm not sure how much I like the button so I would probably change that a bit. With this I learned that you REALLY need to be careful to bind off VERY LOOSELY when doing the edging. It ended up curling funny because I didn't do it loosely enough. I was able to undo it and redo it just fine, though.
Also an update: I am still working on Rachel's dress. I finished one sleeve, but when I started on the next I realized I had read the pattern wrong and made the first sleeve skeewompus. It made sense after I read it, because I wasn't done decreasing by the time the sleeve was to its end and I was wondering how that happened. I'll post pics later so you can see what I mean.
Sunday, September 26, 2010
Current projects
I have three.
I am making a grey cardigan, as previously mentioned, but I'm thinking of just making it a vest instead. I finished the back the other day, wooha!
I am trying to come up with a cute headband/earwarmer pattern. I need to add a button to my first attempt and then it will be finished.
I have been very slow in working on Rachel's dress, because I figured it won't fit her until she's at least two. Well, she's almost two, so I'm back to working on that. I'm getting close to finishing the first sleeve, so maybe this week I can start on the other. At the rate I'm going, I might end up giving it to my next child lol.
I am making a grey cardigan, as previously mentioned, but I'm thinking of just making it a vest instead. I finished the back the other day, wooha!
I am trying to come up with a cute headband/earwarmer pattern. I need to add a button to my first attempt and then it will be finished.
I have been very slow in working on Rachel's dress, because I figured it won't fit her until she's at least two. Well, she's almost two, so I'm back to working on that. I'm getting close to finishing the first sleeve, so maybe this week I can start on the other. At the rate I'm going, I might end up giving it to my next child lol.
Saturday, August 7, 2010
New project: Grey Cardi
I did finish my white cardi a few months ago, but I haven't gotten a picture of it yet. And after finishing my afghan I was itching for another huge project, so I started this cardigan:

It's gonna take a while, but I hope it's done by the time it starts getting cold. The one I'm making is almost the same colors, but the grey in mine is uniform and the gold is more of a tan and it's a multi. Also I'm not going to put pockets on, and I'm not going to do that goofy vest looking pattern with the gold. Hopefully that will make things go a bit quicker, too.
I'll let you know how it goes!

It's gonna take a while, but I hope it's done by the time it starts getting cold. The one I'm making is almost the same colors, but the grey in mine is uniform and the gold is more of a tan and it's a multi. Also I'm not going to put pockets on, and I'm not going to do that goofy vest looking pattern with the gold. Hopefully that will make things go a bit quicker, too.
I'll let you know how it goes!
Finished!
I finished FOUR projects this week!
1) My afghan!!! I finished my afghan!!!
Here's the story one more time. My friend Rizzybet taught me how to crochet my freshman year of college. She taught me how to make snowflake granny squares. I was not very good at it, but I kept trying. I had learned to knit earlier, and made a catastrophe of a scarf that I ended up buying TONS of blue/green multi yarn for, then I pulled it all apart and was left with tons of yarn. I decided to make my snowflakes out of this color, and I wanted to use green as the border.
This worked very well, until my yarn color choices were discontinued! They still had blue/green multi and bright green, but they were not the same color so I couldn't use them. I sulked for many years before my husband finally pushed me to finish the stupid blanket. I finally decided to add a different color, and I chose pink/blue multi with a pink border.
I ran into a problem with the pattern I ended up using to combine the colors. I had absolutely NO extra green yarn, so everything that could be joined with pink had to be. A target pattern ended up working the best, so here it is!
.JPG)
2) I started a beanie and scarf for my brother years ago when he was getting ready for his mission. I finished the scarf a few weeks ago, and I just finished the beanie the other day. No pics, cuz it's just the same hat I always make.
3) Kitty beanie
A friend of mine has really short hair, like girl-hawk short, and she's decided to grow it out. She called for hat donations for the ugly part of the process, so I told her I'd make her a beanie. It only took me a few days to put together, and it was a fun experiment. I ended up throwing in some fair isle stitches, and she asked for kitty ears on it so I found a pattern for that. So cute!

4) I went to Tai Pan Trading with my mom on the way home from a yarn boutique last fall. It was pretty boring, but they did have huge barrels filled with really cute knitted headbands with flowers. I loved them, and what I loved most was that I was SURE I could make them. I've been looking off and on for a pattern ever since. I'm not quite good enough to make up my own pattern, sadly. BUT I found one the other day, and whipped this puppy out in just over a day:


I love it. I think I can sell these for like $8 too :D (let me know if you want to commission one!)
1) My afghan!!! I finished my afghan!!!
Here's the story one more time. My friend Rizzybet taught me how to crochet my freshman year of college. She taught me how to make snowflake granny squares. I was not very good at it, but I kept trying. I had learned to knit earlier, and made a catastrophe of a scarf that I ended up buying TONS of blue/green multi yarn for, then I pulled it all apart and was left with tons of yarn. I decided to make my snowflakes out of this color, and I wanted to use green as the border.
This worked very well, until my yarn color choices were discontinued! They still had blue/green multi and bright green, but they were not the same color so I couldn't use them. I sulked for many years before my husband finally pushed me to finish the stupid blanket. I finally decided to add a different color, and I chose pink/blue multi with a pink border.
I ran into a problem with the pattern I ended up using to combine the colors. I had absolutely NO extra green yarn, so everything that could be joined with pink had to be. A target pattern ended up working the best, so here it is!
.JPG)
2) I started a beanie and scarf for my brother years ago when he was getting ready for his mission. I finished the scarf a few weeks ago, and I just finished the beanie the other day. No pics, cuz it's just the same hat I always make.
3) Kitty beanie
A friend of mine has really short hair, like girl-hawk short, and she's decided to grow it out. She called for hat donations for the ugly part of the process, so I told her I'd make her a beanie. It only took me a few days to put together, and it was a fun experiment. I ended up throwing in some fair isle stitches, and she asked for kitty ears on it so I found a pattern for that. So cute!

4) I went to Tai Pan Trading with my mom on the way home from a yarn boutique last fall. It was pretty boring, but they did have huge barrels filled with really cute knitted headbands with flowers. I loved them, and what I loved most was that I was SURE I could make them. I've been looking off and on for a pattern ever since. I'm not quite good enough to make up my own pattern, sadly. BUT I found one the other day, and whipped this puppy out in just over a day:


I love it. I think I can sell these for like $8 too :D (let me know if you want to commission one!)
Wednesday, July 21, 2010
Recently...
Today I plan on putting up more pictures, I promise.
I recently completed my white cardigan. I was not entirely pleased with the results, and I plan to post reasons why with a picture of the final project later on. Mostly I think I had higher hopes for the pattern than it actually yielded. The next cardigan I am planning on making is a different style, so I hope it turns out a bit better.
I took a trip to Germany with my husband a few weeks ago, and had a chance on the plane to work on my snowflake afghan. Since returning home that has been my main project, so I'll be posting some pictures and hopefully a video of that later on as well.
So...see you later!
I recently completed my white cardigan. I was not entirely pleased with the results, and I plan to post reasons why with a picture of the final project later on. Mostly I think I had higher hopes for the pattern than it actually yielded. The next cardigan I am planning on making is a different style, so I hope it turns out a bit better.
I took a trip to Germany with my husband a few weeks ago, and had a chance on the plane to work on my snowflake afghan. Since returning home that has been my main project, so I'll be posting some pictures and hopefully a video of that later on as well.
So...see you later!
Sunday, May 2, 2010
New Project: White Cardi
Here's the new sweater I'm working on:

I'm doing it in white with a little sparkly. I started it last Monday I think, which was 26. April. We'll see how it goes :D I've already messed up a little...I found a hole a few rows back and had to pull out a few rows to fix it. When I did that my markers came out, and I put them back in the wrong spot. So my sleeve line is going to look a little goofy in one spot :D But I don't think it will be too noticeable.

I'm doing it in white with a little sparkly. I started it last Monday I think, which was 26. April. We'll see how it goes :D I've already messed up a little...I found a hole a few rows back and had to pull out a few rows to fix it. When I did that my markers came out, and I put them back in the wrong spot. So my sleeve line is going to look a little goofy in one spot :D But I don't think it will be too noticeable.
Friday, April 16, 2010
Current Project Pics
Here are pics of the projects I'm currently working on.
This is what Rachel's dress will look like when I finish it:

Here's the sock pattern I started working on but haven't picked up for three weeks:

And I just started this poncho the other day. It's purple. And for sale.

This is what Rachel's dress will look like when I finish it:

Here's the sock pattern I started working on but haven't picked up for three weeks:

And I just started this poncho the other day. It's purple. And for sale.

Sunday, April 11, 2010

Sunday, April 4, 2010
Socks!
I started another project lol. I'm making a pair of socks. Kate gave me a bunch of sock yarn, and I realized I have a lot of sock yarn scraps, so I decided to learn to make socks. I'm not very far yet. I find working with size 3 dpns quite difficult, so I'm not nearly as fast on them as I thought I would be. I'll get better, though :D
Today is General Conference, and that means I'm working on my snowflake afghan! I think this might be finished sometime next fall. I'm planning on making most of the snowflakes on the flight to Germany and back in June/July, and then I'll be working on the borders off and on for the rest of the summer and fall. Once I get all the squares it should only take a day or two to put them all together. I'm very excited :D
Today is General Conference, and that means I'm working on my snowflake afghan! I think this might be finished sometime next fall. I'm planning on making most of the snowflakes on the flight to Germany and back in June/July, and then I'll be working on the borders off and on for the rest of the summer and fall. Once I get all the squares it should only take a day or two to put them all together. I'm very excited :D
Tuesday, March 30, 2010
Rachel's Dress
My mom has a friend who owns a yarn store up in West Valley City (or somewhere around there). She sells really expensive yarn as well as tons of pattern books and needles and hooks and all kinds of stuff. I liked it, but it was really expensive. My mom took me up there when I first started knitting (like the day after I finished my leg warmers) and bought me a pattern book as well as a single pattern for a baby dress for Rachel. She also got me the needles I needed to complete the project. The smallest size is 2T, so I'm not in a huge rush to finish it, which is why I made my purple sweater first :D But I figured since I can't find the needle I need for my next sweater I might as well make this dress now and once Rachel fits into it she can wear it.
Anyway it's a cute dress. It's going to be very warm, as it's intended to be a winter dress. I'm thinking of doing something different with the sleeves because they're huge and silly looking, but we'll cross that bridge when we get to it.
I feel I should start recording the start date of my projects from now on so I have some idea of how long they actually take to complete. This will be helpful when I start commissioning projects, so I can give my customers an accurate time frame.
So. I started Rachel's winter dress yesterday, der 29. Maerz. It could take me over a year to finish, because I don't need those needles or that yarn for anything else. But we'll see what happens :D
Anyway it's a cute dress. It's going to be very warm, as it's intended to be a winter dress. I'm thinking of doing something different with the sleeves because they're huge and silly looking, but we'll cross that bridge when we get to it.
I feel I should start recording the start date of my projects from now on so I have some idea of how long they actually take to complete. This will be helpful when I start commissioning projects, so I can give my customers an accurate time frame.
So. I started Rachel's winter dress yesterday, der 29. Maerz. It could take me over a year to finish, because I don't need those needles or that yarn for anything else. But we'll see what happens :D
Sunday, March 28, 2010
Finito! Purple Sweater!
I love my new purple sweater! I've finally finished and perfected it, and I'm wearing it to school tomorrow no matter what anyone says!


Things I learned:
How to cable stitch
You can't add darts to a knitted sweater the way I tried to do it
When binding off an edge that's not going around something (like the collar of this sweater) do it tightly rather than loosely or it curls weird
Keep track of where you are in the pattern somehow! I used a tally system to make sure I knew which row I was on, and when I got off it was nicht gut. I had to undo a few rows, and that always sucks.
When starting with a crochet cast-on, make sure you put the correct loop on your needle or it won't pull off easily like it's supposed to. I'm not sure which is the correct loop, because out of three I only got one right. When I figure it out I'll explain it haha :D
This makes me so excited. I can knit sweaters! Granted this is an easy pattern with no seams, but the point is that I DID it! My next project is going to be a bit more intense if I can ever find the right needles to do it.


Things I learned:
How to cable stitch
You can't add darts to a knitted sweater the way I tried to do it
When binding off an edge that's not going around something (like the collar of this sweater) do it tightly rather than loosely or it curls weird
Keep track of where you are in the pattern somehow! I used a tally system to make sure I knew which row I was on, and when I got off it was nicht gut. I had to undo a few rows, and that always sucks.
When starting with a crochet cast-on, make sure you put the correct loop on your needle or it won't pull off easily like it's supposed to. I'm not sure which is the correct loop, because out of three I only got one right. When I figure it out I'll explain it haha :D
This makes me so excited. I can knit sweaters! Granted this is an easy pattern with no seams, but the point is that I DID it! My next project is going to be a bit more intense if I can ever find the right needles to do it.
Saturday, March 6, 2010
Preemptive *squeeeeee!*
I'm not finished with this one yet, but I'm so excited that I'm running around my house saying "Look at my sweater!" to everyone. This will be my second functional project, and as it's for me I'm doubly excited about it. This is to be the first of three sweaters I'm planning on making for myself. As you may recall from an earlier post, I can never find sweaters I like so I decided to make some.
 I found the pattern for this one online and fell in love with it mostly because it's purple and I've been wanting a purple sweater to wear to school on Fridays (school colors). Plus I love the collar :D
Alright so here's what I have so far. I've been working on this for just about a month, and I'm pretty impressed with how far I am considering I've taken it apart twice already. Today is exciting because I just joined the two fronts together, and I'd say I'm almost to the halfway point :D Just two more inches, then six more inches, then two sleeves, then collar! Bam! I give it another two months lol. Here's what mine looks like today:
 And here's a closeup of the collar. The cables are really pretty.
 I still have quite a ways to go, but I'm really excited about how well it's turning out :D
 I found the pattern for this one online and fell in love with it mostly because it's purple and I've been wanting a purple sweater to wear to school on Fridays (school colors). Plus I love the collar :D
Alright so here's what I have so far. I've been working on this for just about a month, and I'm pretty impressed with how far I am considering I've taken it apart twice already. Today is exciting because I just joined the two fronts together, and I'd say I'm almost to the halfway point :D Just two more inches, then six more inches, then two sleeves, then collar! Bam! I give it another two months lol. Here's what mine looks like today:
 And here's a closeup of the collar. The cables are really pretty.
 I still have quite a ways to go, but I'm really excited about how well it's turning out :D
Rachel's Sweater
I finished this a while ago but haven't gotten a pic up yet, and these aren't the best anyway since they're from my phone. But here's the cute sweater I made for my daughter!

I'll put up better pics of just the sweater later, but right now I'm just ultra excited that I actually finished a usable project! It's only going to fit her for a few more weeks, but she likes it and so do I :D

Things I learned:
How to guesstimate pattern changes as necessary when using a different size yarn
How to knit sleeves :D
How to follow a more difficult pattern
How to effectively bind off
How to adjust sweater length after you finish the project and it's too short lol
COUNT YOUR STITCHES AS YOU GO!!
Things I'd do differently:
I'd still like to make it a little longer haha
It calls for a button on the front that I didn't add. I think I'd like to put one on but I just haven't gotten around to it.
Richard suggested I turn this into a dress, and I think that would be a fun experiment :D

I'll put up better pics of just the sweater later, but right now I'm just ultra excited that I actually finished a usable project! It's only going to fit her for a few more weeks, but she likes it and so do I :D

Things I learned:
How to guesstimate pattern changes as necessary when using a different size yarn
How to knit sleeves :D
How to follow a more difficult pattern
How to effectively bind off
How to adjust sweater length after you finish the project and it's too short lol
COUNT YOUR STITCHES AS YOU GO!!
Things I'd do differently:
I'd still like to make it a little longer haha
It calls for a button on the front that I didn't add. I think I'd like to put one on but I just haven't gotten around to it.
Richard suggested I turn this into a dress, and I think that would be a fun experiment :D
Sunday, February 21, 2010
Crochet: My First Love
I started crocheting my freshman year of college. I think I saw a friend with a cool scarf and she told me she made it, so I decided I wanted to try. I had a friend show me how to make a scarf and hat, and that was it for a while. But then I moved in with a yarn fanatic who really showed me how to get going. She had made a snowflake afghan that I just loved, so I decided I wanted to make one too.
Funny story...the yarn I ended up using for the afghan was the same yarn I bought when I was 16 for a mutual night where a girl showed us how to knit scarves. My scarf was ridiculous beyond belief. It was about 3 feet wide and almost 4 feet long before I decided to bag it and try something else. I pulled the whole thing apart and ended up with all these balls of blue and green multi. I decided to use that color for the middle of the snowflake squares, and I'd find a bright green to border them.
After my roommate showed me how to make the snowflakes, I got working. I was really slow and my work was really tight, but after lots of crochet nights with the girls where I was able to watch and learn some better techniques I got faster and looser, and now I think my gauge is perfectly average for most patterns that I've found, which is nice :D
I worked inconsistantly on these snowflakes for the next year or so, until I had enough to put a couple rows together. I decided that once I finished that afghan I was allowed to get married. Well, I ended up getting married before I picked it up again (lol), and three years later my husband is urging me to finish it. Really the reason I haven't yet is that they discontinued the yarn and I've had to figure out another option. Which I recently did, so hopefully in the next few years I'll be able to finish the afghan I started when I was 18. But I digress.
In between working on that afghan, I decided to learn to crochet beanies for my little brothers and sister. Here are a couple of the beanies I've made since then:

This is the one I made for Richard. He bugged me and bugged me to make him a beanie. I think it was a little thicker than he was expecting, though, so he didn't end up wearing it much.
This is three yarns crocheted together in just a double crochet all the way around. I've got a how-to video in the works.

This is the one I made for myself. I like the yarn I chose because even though there's three strands, they're really soft and thin so it's not too bulky. Again this is just double crochets all the way around.
I made beanies like these for my siblings a couple Christmases in a row and then took a break for a while. This year they really missed them, so I decided to try something new. Mostly because I lost my N hook so I had to use a smaller one. I experimented with a hat for Rachel first, since I couldn't seem to find a hat at the store that would fit her head for longer than a week. I had some yarn left over from her baby blanket, so I stuck that with a shiny white color and came up with this:

It's basically the same pattern as before, just with two yarns and using a half double all the way around. It worked out pretty good.
When I made the hats for the kids they ended up being a bit thicker, but they sure love them. If I can round them up I'll post some pics later.
Funny story...the yarn I ended up using for the afghan was the same yarn I bought when I was 16 for a mutual night where a girl showed us how to knit scarves. My scarf was ridiculous beyond belief. It was about 3 feet wide and almost 4 feet long before I decided to bag it and try something else. I pulled the whole thing apart and ended up with all these balls of blue and green multi. I decided to use that color for the middle of the snowflake squares, and I'd find a bright green to border them.
After my roommate showed me how to make the snowflakes, I got working. I was really slow and my work was really tight, but after lots of crochet nights with the girls where I was able to watch and learn some better techniques I got faster and looser, and now I think my gauge is perfectly average for most patterns that I've found, which is nice :D
I worked inconsistantly on these snowflakes for the next year or so, until I had enough to put a couple rows together. I decided that once I finished that afghan I was allowed to get married. Well, I ended up getting married before I picked it up again (lol), and three years later my husband is urging me to finish it. Really the reason I haven't yet is that they discontinued the yarn and I've had to figure out another option. Which I recently did, so hopefully in the next few years I'll be able to finish the afghan I started when I was 18. But I digress.
In between working on that afghan, I decided to learn to crochet beanies for my little brothers and sister. Here are a couple of the beanies I've made since then:

This is the one I made for Richard. He bugged me and bugged me to make him a beanie. I think it was a little thicker than he was expecting, though, so he didn't end up wearing it much.
This is three yarns crocheted together in just a double crochet all the way around. I've got a how-to video in the works.

This is the one I made for myself. I like the yarn I chose because even though there's three strands, they're really soft and thin so it's not too bulky. Again this is just double crochets all the way around.
I made beanies like these for my siblings a couple Christmases in a row and then took a break for a while. This year they really missed them, so I decided to try something new. Mostly because I lost my N hook so I had to use a smaller one. I experimented with a hat for Rachel first, since I couldn't seem to find a hat at the store that would fit her head for longer than a week. I had some yarn left over from her baby blanket, so I stuck that with a shiny white color and came up with this:

It's basically the same pattern as before, just with two yarns and using a half double all the way around. It worked out pretty good.
When I made the hats for the kids they ended up being a bit thicker, but they sure love them. If I can round them up I'll post some pics later.
Recent Projects
I recently (ok like two months ago) finished a couple knitting projects! Here are some pics and details:
Richard's Beanie
 Things I learned:
Knit in the round
Knit with circular needle
Knit with double pointed needles
Decrease
Things I will do better next time:
Don't decrease so soon. It ended up being a little shorter than I thought.
I need to figure out a better decrease pattern as well, as the top of the hat kind of looks silly.
Leg Warmers!
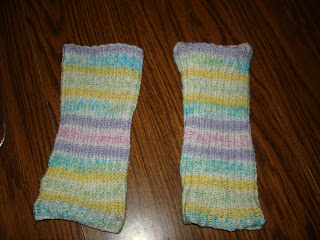 Things I learned:
How To Knit (basically)
How to undo stitches without starting completely over
How to cast on
How to bind off
How to purl
Things I'll do better next time:
I got excited about them being done too soon. The next pair will be a lot longer.
Even though I used a bigger needle to bind off it's still really tight. I need to think "loose" when binding off.
I'm having so much fun knitting! I finished a sweater for Rachel a few weeks ago (post forthcoming in a few days once I get pics) and now I'm working on one for me. I need to make Richard a better hat, or fix the one he has. And don't worry, I have three more sweaters lined up to make for myself. Really that's why I started knitting: I couldn't find any sweaters I liked so I decided to make my own.
Richard's Beanie
 Things I learned:
Knit in the round
Knit with circular needle
Knit with double pointed needles
Decrease
Things I will do better next time:
Don't decrease so soon. It ended up being a little shorter than I thought.
I need to figure out a better decrease pattern as well, as the top of the hat kind of looks silly.
Leg Warmers!
 Things I learned:
How To Knit (basically)
How to undo stitches without starting completely over
How to cast on
How to bind off
How to purl
Things I'll do better next time:
I got excited about them being done too soon. The next pair will be a lot longer.
Even though I used a bigger needle to bind off it's still really tight. I need to think "loose" when binding off.
I'm having so much fun knitting! I finished a sweater for Rachel a few weeks ago (post forthcoming in a few days once I get pics) and now I'm working on one for me. I need to make Richard a better hat, or fix the one he has. And don't worry, I have three more sweaters lined up to make for myself. Really that's why I started knitting: I couldn't find any sweaters I liked so I decided to make my own.
Subscribe to:
Posts (Atom)